Showing posts with label 2nd grade. Show all posts

Friday, December 12, 2014

Steaming Cups


Materials:
 
Colored permanent markers
9X12 white paper
Small pieces of batting
 
1. This lesson plan allows the students to choose and draw very simple patterns. You could also adapt this to holiday time and students can make a festive tea or coffee cup.
 
2. Give suggestions to students on drawing very simple patterns in the background and on the cup. Instruct to use basic easy patterns with simple lines and shapes. Also stress that patterns should not be too small and squished together.
 
You may provide one or more types of cup templates for students to use, or guide them in drawing their own. They can add their own type of handle, and they will also draw a saucer underneath. Instruct on drawing the horizontal line halfway across. They will then draw their patterns on the cup, background and foreground.
 
3. Students then use markers to color in designs.
 
4. Take small pieces of batting and roll in your hands and glue securely on, to show steam coming up.


Wednesday, December 10, 2014

Magnified Insects


Materials:

12X15 lime, light or dark green paper
Oil pastels in shades of green
Tempera or acrylic paints
Colored markers
Black paper
Images of various insects
A template for a magnifying glass appr. 5 or 6 inches in diameter.

1. Discuss the concept of magnification with students. This applies to science. If you have actual magnifying glasses to let them experiment with, that is awesome, but you could also show images of various objects in magnification.

2. Discuss sizes, colors and parts of insects. Note that insects can be many varying colors. Allow the students to choose which insect they would like to draw, after looking at various images to get ideas. (You will most likely have a lot of girls choosing ladybugs and boys choosing spiders, so it is up to you on how many of those you end up with!) Emphasize to students that the bugs should have a head, thorax and abdomen. It should also fit onto a 5 or 6 inch piece of paper, so that it will be a "magnified" insect. Direct students to draw it large. They can add colors and details with colored permanent markers. They should also color greens around the insect with oil pastel.

3. Students will draw the grass on their green piece of paper. Instruct on how to draw blades of grass with oil pastels without it being too scribbly.

4. Students can them paint some flowers on their grass with acrylic paint. Some of the paint might go thinly over the oil pastel, so they may need to do another coat. They can also paint a tiny insect somewhere in the grass if they wish.

5. Make some templates of a simple magnifying glass shape and have students trace and cut out of black paper, or you can make the magnifying glasses for them. Students will glue magnifying glass onto their insect paper, making sure it fits correctly over the insect, and trim off the excess paper around the black round part.

6. Students will glue the magnifying glass with insect onto their flower background.


Saturday, June 15, 2013

Crab Collages


Materials:

White paper 9X12
Beige paper
Red felt
Scrap paper
Buttons
Beads
Leaves
Strips of mat board
Sand

1. Cut the beige paper into 3 inch wide strips. Have students tear the strips down lengthwise to give it an uneven look. This will be the sand at the bottom.
2. Cut the 9X12 felt in half. Give each student a half. They will cut an oval shape, or they can trace an oval template, and cut out.
3. Glue the sand strip at the bottom of the white paper.
4. Glue the oval felt shape right above the sand.
5. Have various small pieces of scrap paper. Students will cut out rings and circles and glue them onto the crab body.
6. They can cut several triangle shapes for the legs, and glue those on the sides. Crabs have eight legs, but it might be difficult to fit them all, so they could do 3 on each side.
7. Apply glue across bottom of beige paper, sprinkle sand over it, let dry.
8. Add buttons and beads for the eyes.
9. Cut strips of mat board very thinly on a paper cutter. Cut to be about 4 inches long.
10. Glue these on for antennas.
11. Gather some leaves that would work for the crab claws. Press them in a book overnight to help keep them from drying out. (I learned the hard way, if you don't do this, the leaves will crumble after they are glued on)
12. Cut the leaves in half, and glue on to make the claws
13. Apply ModPodge on the leaves to help preserve them.


Saturday, June 23, 2012

Circus Elephants

I saw this project on funart4kids but with a few modifications. Love the marker/watercolor idea!


Materials:

Colored paper
Colored string
Black washable marker
Small beads
White paper
Chalk pastel
Glittered or shiny paper

1. You can guide the students in drawing an elephant, or provide a template.
2 Draw the elepant, about 10 inches long.
3. Carefully cut out the elephant.
4. Outline the elephant with black marker, like Crayola. Don't forget to outline the ear. Add some tiny lines on the trunk for wrinkles.
5. Use a wet brush over the marker outlines to produce a watercolor effect.
6. Pre-cut strips of paper for the floor in various colors, about 3 in.wide
7. Let students choose a floor color and background color of paper. Glue floor piece onto background piece.
8.. Glue strips of paper onto background for stripes.
9.  Glue on elephant, except for front foot.
10. Cut out ball  and scalloped border piece. Provide template for the scalloped piece.
11. If desired, stick on pop dots, then glue on scalloped piece for a pop out effect.
12. If desired place a pop dot under the ball for pop out look. Glue on.
13. Cut a blanket from glittered or glossy paper. Decorate with beads or sequins.
14. Cut string into small pieces, glue on blanket for fringe.
15. Shade the floor at the top slightly with a chalk pastel, blend with fingers.
16. Glue colored dots on scalloped awning


Tuesday, June 12, 2012

Adjective Monsters


A more detailed version of this lesson plan can be found on ArtsEdge

This lesson explores the connections between visual art and language arts, and how both are used to creatively tell stories and express emotions. Students will read the book Go Away Big Green Monster by Ed Emberley. They will be introduced to adjectives as descriptive words then create their own monsters using paper sculpture techniques.

Materials:

Black const. papercut to 12X18
Colored const.paper.
Ideas for paper sculpture (twisting, curling, folding,etc)
White chalk or pastel
Sample list of adjectives

1. Read book to students. Discuss the use of adjectives in the book, and ask volunteers to think of some good adjectives. ( discuss adjectives that describe an emotion or the way something looks.

* It is up to you to decide to use a sample adjective list. I usually do this project with 2nd graders and sometimes we end up with a lot of the same adjectives. Encourage using a very unusual adjective.

2.Instruct that once they have decided on an adjective, to think of how they will make their monster look like that word.

3. All parts of the monster face will be cut from paper, no drawing. Instruct that the head must be big, almost as wide as the black paper, and it can be any shape (not nessesarily round)

4. They will write the words at the top half of the black paper: Go Away Big              Monster  with their chosen adjective written in the blank.

5. Demonstrate how they can make their paper parts "stick out" by bending, curling, cutting and folding the paper different ways.

6. They will create their monster keeping in mind to make it look like their adjective.


Tuesday, June 5, 2012

Summertime Projects

Summer is here, and we are taking some breaths and maybe thinking a complete thought here and there! Last year, I thought I might try something a little different for the first project back to school, and we made some summer scenes, because well, it still feels like summer in TX. when we go back to school!

Surfboards
 Materials:
Paper cut to 12X15
Watercolor
Permanent markers
White oil pastel

1.Draw a wave design on white paper about half way up. (Yes, it can be a challenge to see white on white, but the kids actually enjoy the challenge) The paper can be turned either vertically or horizontally. Paint over with blue watercolor.

2. Provide handouts of different surfboard designs, and students can use their own ideas.  color with markers.

3. Use a template, or allow them to draw the surfboard shape, making it big enough. Glue onto waves. Cover surfboard with "wax" (varnish or Modpodge)


Beach Collages

Materials:
White paper cut to 12X15
Manila paper, torn in half lengthwise
Blue plastic wrap, or cellophane
Shells
Sand
Little pieces of towel, cut about 2X3 inches
Tackyglue

1. Paint sky with watercolor.
2. Glue manila paper across the bottom, trim off excess length.
3. Cut a small piece of plastic wrap to fit width wise. Wrinkle it and glue it across the top of manila paper.
4. Make small wavy lines with glue on "sand" or manila paper. Sprinkle sand over it.
5. Glue on some shells and the towel.
6. Glue on a sun.


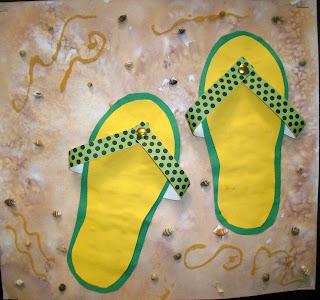
Flip Flops

The idea for the flip flops came from Art Projects For Kids

Materials:
Colored paper
Strips of printed scrap paper
White square paper about 12X12
Sand
Shells
Brass Brads

1. Paint the white paper with lt. brown watercolor using wet into wet.
2. Use a template to cut out flip flops, and a slightly bigger one for the edging. Glue these together.
3. Glue the straps to the back of the flipflop, coming out horizontally. Let dry.
4. Attach a brad to the ends of the strap and poke through the flip flop and attach. (You can pre-poke a hole to make it easier and more accurate.
5. Decorate background with swirls of glue, then sprinkle sand. Add a few shells


T Tube Fish


Materials:

TP tubes
Watercolor paper or heavy white paper
Colored plastic notebook dividers
Colored dots
Plastic wrap
Watercolor

1. Make background by painting with watercolor, then placing a piece of wrinkled plastic wrap on it, leave to set for a while.

2. Paint the tube any color. We used metallic paint.

3. Cut two even slits at the bottom and top of the tube.

4. Provide a template for the fins and tail. Make two front fins and one tail. Students trace and cut on the plastic.

5.Put a couple dabs of tacky glue in the slits and slide the tail and fins into them and let dry.

6. Students can place colored dots on the tube for scales. Place one at the top for an eye, or paint it, then draw an eyeball.

7. Glue onto background.

Rain Forest


This rain forest mural can be done with all grade levels, with each one making a certain group, ex. Kinder can make trees and tree branches, 1st gr. can make leaves and flowers, 2nd gr. can make butterflies and insects, 3rd can make reptiles and amphibians, 4th,5th can make any other rain forest animal.

   You can provide a list of animals that come from the rain forest, and they can choose.( Of course, snakes are very popular, so you may need to steer some students towards another really cool animal) Students can use paint, markers and pastels. We discussed the levels of the rain forest and the animals that live in each level. They can place their animal or plant where it should go.


Insects and a Few Spiders


This idea is from Fem Manuals   but with a few modifications.
Materials:
Felt
String
Tag board
Plastic notebook dividers
Scrap paper
Wire.
Pinking shears
Pom poms
Tacky glue

1. Cut ovals from tagboard, about 5 inches long.
2. Cut ovals from felt.
3. Students will glue these pieces together, and cut 4 or 5 slits on each side. (or teacher can do this)
4. Students will criss cross the string, starting from the back.
5. Cut small ovals from colored plastic for insect wings. If student would like to make a spider, then of course, no wings. Glue these on.
6. Use pinking shears to cut legs. glue these coming from back.
7. Cut a half oval from scrap paper and glue that on for the head.
8. Curl the wire if desired, and attach pom poms if desired for antenaes
9. Use some paper qulling and tightly curl strips of paper, for insect eyes. Glue on.


If student is making a spider, remind them to attach eight legs, (although I find every student knows this about spiders) and can use "hairy" yarn.


If you would like to mount one insect for display, here is an idea: