Showing posts with label 1st grade. Show all posts

Saturday, January 9, 2016

Abstract Painting For Young Ones


Kinder and 1st Gr.

Abstract art is wonderful, but it can be problematic when you want to delve into it. How do you explain it to youngsters? How can you facilitate the creation of intriguing abstract art without it becoming a mushy mess? There are probably many good methods for this, but here is a suggestion for one way to go about it. You will find that their natural brush strokes lend themselves perfectly to abstract art.

Materials:

Good quality tempera or acrylic paint.
Heavy weight paper.
Images of abstract art.Try Kandinsky,Pollock, Miro, Rothko, or whatever are your favorites.

Critique

1. Show some images of abstract art to the students.
2. Ask questions about it. Allow them to answer, one at a time. Sometimes it can be difficult to delve into a "critique" with little ones, but the more you do it, the more they will understand that they must takes turns speaking. 
3. Discuss the idea that abstract art is basically lines, shapes and color.

Production

One of the keys to producing non-muddy abstract paintings is to let the paint dry between steps. This might be tricky if you see your students once a week, as it might take too long to finish the work. Another method is to have them thoroughly dry their brush in between colors by wiping it on a towel without using water.

1.  Give the students 3 or 4 colors of paint. Start by painting some basic shapes anywhere on the paper. Remind them to make them big, and they can't overlap. Don't mix the colors. Demonstrate. You can also have them turn their paper different directions as they paint, so as to get away from making all the shapes in a straight line. Allow the paint to dry.
2. Give the students 3 or 4 different colors than they had before. They will paint in the background and around their shapes. Remind them to paint thickly, and not to paint over their shapes. Allow to dry.
3. Give students black and white paint. Instruct on painting different types of line; zig zag, straight, curly, etc. They will paint these anywhere on the paper. Rinse brush, and use white paint to do more lines. They can outline some of their shapes or make dots. Remind them not to paint a picture of a flower or truck, as these are just lines and shapes! Also, remind them to keep the lines separate and don't paint white on top of black.


Tuesday, June 12, 2012

Pop Art Pizza


Take Heed! You will end up with a lot of paper shreds on the floor!

Materials :

Brown grocery bags
Green paper
Brown paper
Beige scrap paper (like manila) that has been shredded. (You can cut it into shorter pieces)
Red vinyl or pleather.
Red paint
Other colored paper

1. Cut brown paper into long triangle shapes, appr. 10X18 inches. Students will partly roll the wide end to form the crust. Glue down.
2. Paint the triangle, or slice, with red paint for the sauce.
3. Once dry, let students glue on items they want on their pizza. They can cut out little sausage, tomatoe, pineapple, green onion pieces from paper.
4. Students can cut out circles from vinyl, or teacher can do for smaller children.
5. Make sure everything is glued securely.


Adjective Monsters


A more detailed version of this lesson plan can be found on ArtsEdge

This lesson explores the connections between visual art and language arts, and how both are used to creatively tell stories and express emotions. Students will read the book Go Away Big Green Monster by Ed Emberley. They will be introduced to adjectives as descriptive words then create their own monsters using paper sculpture techniques.

Materials:

Black const. papercut to 12X18
Colored const.paper.
Ideas for paper sculpture (twisting, curling, folding,etc)
White chalk or pastel
Sample list of adjectives

1. Read book to students. Discuss the use of adjectives in the book, and ask volunteers to think of some good adjectives. ( discuss adjectives that describe an emotion or the way something looks.

* It is up to you to decide to use a sample adjective list. I usually do this project with 2nd graders and sometimes we end up with a lot of the same adjectives. Encourage using a very unusual adjective.

2.Instruct that once they have decided on an adjective, to think of how they will make their monster look like that word.

3. All parts of the monster face will be cut from paper, no drawing. Instruct that the head must be big, almost as wide as the black paper, and it can be any shape (not nessesarily round)

4. They will write the words at the top half of the black paper: Go Away Big              Monster  with their chosen adjective written in the blank.

5. Demonstrate how they can make their paper parts "stick out" by bending, curling, cutting and folding the paper different ways.

6. They will create their monster keeping in mind to make it look like their adjective.


Thursday, June 7, 2012

Triple Scoops With Sprinkles

.

Materials:
Black paper cut to 5X15
Tempera paints
Tissue paper
Colored paper for edging
1. For little ones, pre sketch a cone shape so it has the right placement so there is room for three scoopes.
2. Paint cone, and each cone a different color. It is best to do them one at a time.
3. Students can choose one cone, and apply confetti or crinkled pieces of tissue for sprinkles.
4. Glue onto a colored piece of 7X17 paper for a more finished look.

Tube Octopuses


Materials

Paper towel tubes
Tempera paint
Colored notebook ring tabs and dots
Sequins
Googly eyes.

1. Have students write their name on the inside bottom of the tube. Paint the outside.
2. Paint the inside a different color, but leave the name at the bottom inside.
2. Cut the tube into 8 even strips to halfway down.
4. Curl them and twist them.
5. Apply rings with glue. Glue a sequin here and there.
6. Glue googly eyes at the bottom

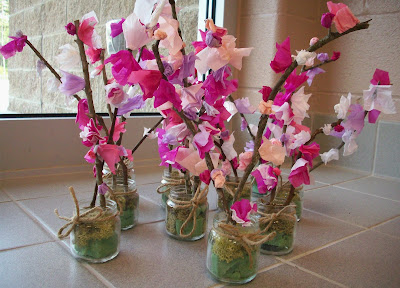
Spring Blossom Sculptures

Saw this idea on Fem Manuals, but with a couple modifications. I have an abundance of baby food jars, so we used those instead of ceramic pots.


Materials:

Twigs, about 10 inches

Pink, and white tissue paper squares
Baby Food Jars
Florist foam pieces
Dried moss
Twine or ribbon
Tacky glue

 1.If you do this with young ones, give students a jar with sticks already poked into some foam inside the jar. This is easier, as students might crush or break the foam.
2. Students will crinkle the tissue and glue it onto the sticks. Remind them that they can make some "buds" also.
3. When done let them place some moss on the top of the jar, and push it around and down so that it fits snugly.
4. Tie the twine or ribbon onto the jar.

These can be used for Mothers Day. If desired students can use paint markers to write something on the jar.

Tuesday, June 5, 2012

Summertime Projects

Summer is here, and we are taking some breaths and maybe thinking a complete thought here and there! Last year, I thought I might try something a little different for the first project back to school, and we made some summer scenes, because well, it still feels like summer in TX. when we go back to school!

Surfboards
 Materials:
Paper cut to 12X15
Watercolor
Permanent markers
White oil pastel

1.Draw a wave design on white paper about half way up. (Yes, it can be a challenge to see white on white, but the kids actually enjoy the challenge) The paper can be turned either vertically or horizontally. Paint over with blue watercolor.

2. Provide handouts of different surfboard designs, and students can use their own ideas.  color with markers.

3. Use a template, or allow them to draw the surfboard shape, making it big enough. Glue onto waves. Cover surfboard with "wax" (varnish or Modpodge)


Beach Collages

Materials:
White paper cut to 12X15
Manila paper, torn in half lengthwise
Blue plastic wrap, or cellophane
Shells
Sand
Little pieces of towel, cut about 2X3 inches
Tackyglue

1. Paint sky with watercolor.
2. Glue manila paper across the bottom, trim off excess length.
3. Cut a small piece of plastic wrap to fit width wise. Wrinkle it and glue it across the top of manila paper.
4. Make small wavy lines with glue on "sand" or manila paper. Sprinkle sand over it.
5. Glue on some shells and the towel.
6. Glue on a sun.


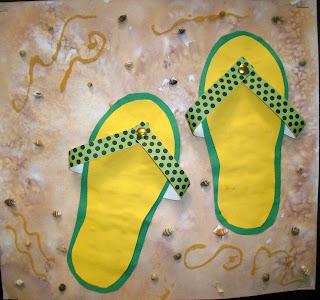
Flip Flops

The idea for the flip flops came from Art Projects For Kids

Materials:
Colored paper
Strips of printed scrap paper
White square paper about 12X12
Sand
Shells
Brass Brads

1. Paint the white paper with lt. brown watercolor using wet into wet.
2. Use a template to cut out flip flops, and a slightly bigger one for the edging. Glue these together.
3. Glue the straps to the back of the flipflop, coming out horizontally. Let dry.
4. Attach a brad to the ends of the strap and poke through the flip flop and attach. (You can pre-poke a hole to make it easier and more accurate.
5. Decorate background with swirls of glue, then sprinkle sand. Add a few shells


Rain Forest


This rain forest mural can be done with all grade levels, with each one making a certain group, ex. Kinder can make trees and tree branches, 1st gr. can make leaves and flowers, 2nd gr. can make butterflies and insects, 3rd can make reptiles and amphibians, 4th,5th can make any other rain forest animal.

   You can provide a list of animals that come from the rain forest, and they can choose.( Of course, snakes are very popular, so you may need to steer some students towards another really cool animal) Students can use paint, markers and pastels. We discussed the levels of the rain forest and the animals that live in each level. They can place their animal or plant where it should go.


Long Legged Birds

 This lesson explores the concept of opposites and color perception. You can have the students name some opposites, (like hot/cold, etc.) Though B&W aren't technically opposite colors,(as on the color wheel) you can explore how colors look against other colors (Albers)


Materials:
B&W paper cut to 10X15
White paint
Black paint
Small colored paper squares

1. Give students either a W or B paper.(You could let them choose,but if you are planning to display these, there will probably be an imbalance. Instruct on drawing the bird body like a tear drop shape. Remind them to leave a little space at the top.. Or, you can use a template. Add a circle head.
2. Paint over drawn bird body and add head and tail feathers, and beak. Paint claws on bottom.
3. Glue on colored squares.
4. Add a small dot for the eye.


Zebra Collages

Can you tell I like mixed media? We all have our fav's we gravitate towards, and mixed media is defintely one of mine. It doesn't always seem to be a favorite for people who "judge" art contests, but as art teachers, we are constantly trying to balance what we believe is important for the kids to do, and what others might be pleased with. More about that later.

I found this zebra look on this website
http://krokotak.com/2010/08/aplikatsii-ot-kragtcheta/


Materials:
Blue paper cut to about 12X15
Vanilla paper :)
White paper
Black markers
Batting
B&W yarn
Old straw broom pieces.
Pom poms
Googly eyes (optional)
Tacky glue

1. Have students tear a piece of manila paper and glue on, torn side up.
2. Trace a rectangle on white paper about 4" X 5"
3. Provide strips of white paper for students to make legs,neck and head.
4. Draw stripes on body, legs, neck and head. Show images of actual zebras so they can see how the stripes are curved and vary in width. Encourage to draw them this way, otherwise you will get straight up and down stripes.
5. Assemble and glue down the parts.
6. Tear pieces of batting for clouds, if desired. Add a pom pom for nose, draw eye or use googly eye, add b&w yard for mane and head. Glue on pieces of broom for grass.