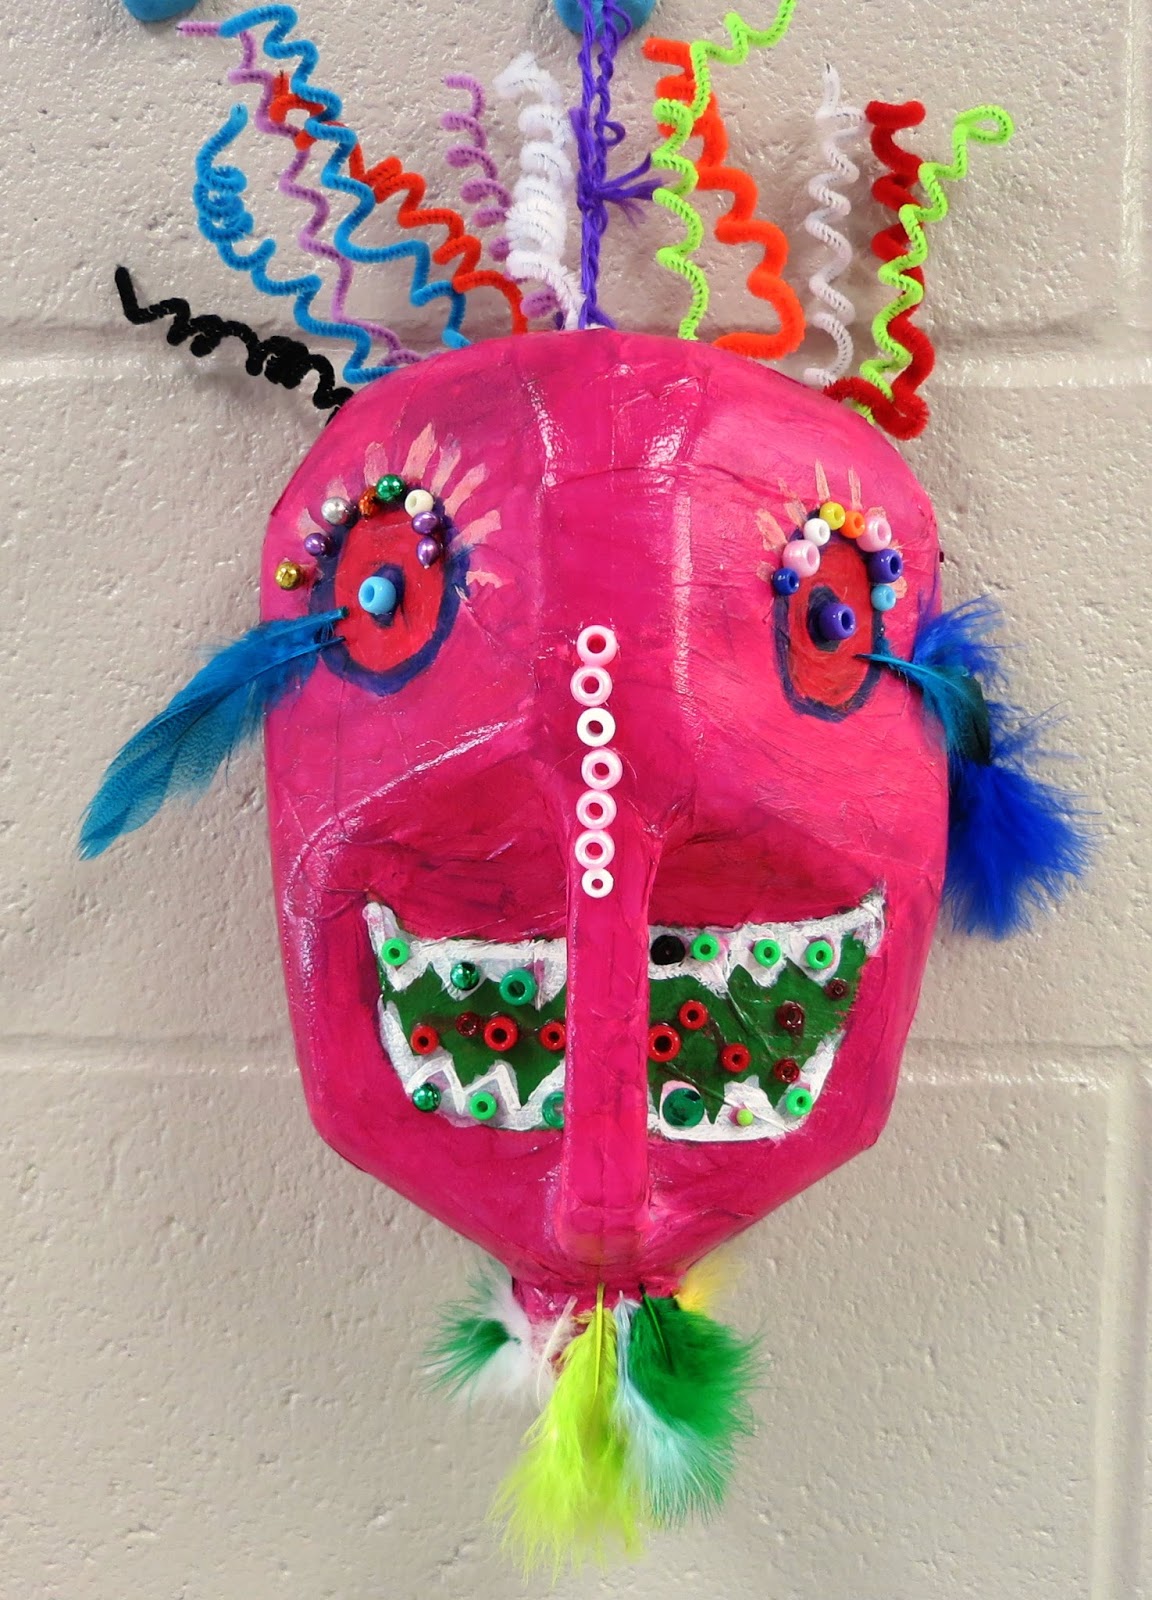
Showing posts with label 4th grade. Show all posts

Friday, August 16, 2013


Milk Jug Masks


There are so many possibilities when using milk jugs as the armature for a mask, and of course, there are many types of masks to make. I did this project with 4th gr. We discussed the idea of masks, and looked at different types, from animal, African, masquerade, Chinese, and also "fantasy" masks. I prepared and set out a variety of materials the students could use.
       The major key to success in this project is to have the students brainstorm and draw a sketch of the mask they would like to make. It could be just about any type of mask, but insist that once the sketch is done, they must stick to that idea and not change their minds later. Otherwise, you will have many wasted materials.

Materials:

1. Gallon milk jugs, cut with scissors halfway down, with the handle side being used for the mask. You can save the other plastic and cut into strips or other shapes to use with the mask. The beauty of these jugs is that it is easy to cut and punch holes using a hole punch and scissors
2. Colored tissue paper
3. Glue and water
4. Paint
5. Materials such as plastic bottle caps, felt, fun foam, feathers, sequins, wire, raffia, pom poms, beads, fabric, chenille stems, and whatever else you can think of!
6. Tacky glue

Procedure:

      1. Make sure that students have done a sketch with a completed idea for a mask. I allowed them to do any type of mask they wished (within reason) but if you want to keep it to a theme, that works too. I provided a pre-drawn drawing of an outline of the shape of the mask to make it a little easier for them to visualize the shape of the mask. Emphasize that the mask front can be with the spout part up or down. Once the sketches are done, keep them and let students use them for reference. Once again, insist that they stick with their original idea. They can add to it as they go along or slightly modify it, but many times they will want to completely change their idea, once they see the different materials set out. This results in wasted materials and a mask that is not good quality.
     
      2.Have them write their name with marker on the underside of the mask. They will choose a colored tissue paper, tear it into strips and glue onto the jug, covering entirely and smoothly. You may also use newspaper.
      3.Once dry, they may paint the mask any way they wish that fits with their idea.
      4. Adding designs, features and embellishments- I have found it works best to set out only the paint for one or two days, and wait for everyone to finish that step before you move on to the next step. There can be so many materials for this project, that the students can get overwhelmed by the choices if you set them out all at once.
      5. Give them a paper plate or a little bowl for each student to put her/his supplies in. Set them all out on a table, and they can choose what they want to use, and keep it in their bowl for next time. It helps to make sure one or a few students don't take more of a supply than they really need.
      6. You can punch holes in the plastic to tie wire, raffia, or chenille stems to the mask. Bottle caps with glass beads can be used for eyes.
     
      It is so much fun to see their ideas!


Sunday, July 8, 2012

Simple Self Portraits


I don't know about you, but self portraits actually aren't my favorite lesson to do with young students. I have found that trying to place too much emphasis on realism and proportion in the traditional way usually ends up with more students feeling frustrated than successful. After all, faces and people are the hardest thing to draw! We look at ourselves every day, yet our left brain gets in the way and makes us draw what we think we look like, instead of what is really there. (Drawing On the right Side of the Brain, by Edwards,does an excellent job explaining this)

     Anyway, I did find a good idea on Art Projects for Kids for a simplified way to do self portraits. It simply uses a circle for the head shape, and allows the students to draw simple lines for the nose and mouth.

Materials:

Circle templates
White 9X12 paper
Rulers
Markers
Chalk pastels in skin colors

1. Have students measure a one inch border around the paper, then a 1/4 inch inside that. (I have found that measuring is one of the most challenging tasks for students, but a good learning opportunity for them.)

2. Students will trace the circle template exactly in the middle of the frame.

3. Eyes- This project gives the big eye look, but if you prefer, you can do the eyes in regular proportion. You can provide a template or not. Instruct to draw a football shape, round iris, and round pupil. It is important to get the eyes evenly spaced and the same size.

4. Draw a small curved line for the nose.

5. Draw a "flying bird  shape" for the mouth. Girls can draw lips, and boys can draw just a curved line for the mouth. No teeth!

6. Draw diagonal lines down from the head for shoulders.

7. I find that chalk pastels work best for shading in faces. They can blend it in with their finger, so their are no scribble lines. If students have darker skin, have them build the color slowly, so it is more even.

8. Students can use colored pencil or a light peach/pink marker for the nose and mouth.

9. Hair- Oh hair! Challenging! I found the best luck with coloring in lightly with a light cream chalk pastel, and then brown, darker brown, in layers over the top. more yellow/white for blondes. They can make some of the hair go out of the frame slightly. Instruct to make the hairline long enough and not forget the sides of the head. For students with short hair, or pony tails, don't forget to draw ears!

10. Clothes, they can color those any way they wish.

11. Background and frame can also be colored in whatever colors they wish.

12. They can write their name at the bottom, and color in with marker.


Monday, June 18, 2012

Beautiful Horses


This lesson is based on the book by Van Camp and illustrated by Littlechild. I had the idea to combine some of the book's ideas with ideas of Chagall.

Materials:

Paper, cut to 12X15
Oil pastels
Liquid watercolors
Permanent markers
Foam scrap booking dots.

1. Read book to students. Discuss the idea of fantasy and the way the horses are depicted.
2. This can be done with or without a border. We did a simple one inch border with one inch squares.
3.. Do guided drawing for background. Divide the paper into three sections going in diagonals. Use oil pastels to draw very simple lines and shapes, like moons, suns, flower, bird, etc. Emphasize a kind of dreamy quality, like Chagall.They can turn the paper upside down and sideways when drawing shapes. Also emphasize drawing simple outlines of shapes.
4. In one of the three sections, they can draw lines or patterns to fill it in.
5. Do watercolor washes over the pastel drawing.
6. Instruct on drawing a horse with basic shapes, on a separate piece of paper. The horse should be about 6 inches long. They can draw the mane and tail how they wish, and add color and simple lines and shapes with oil pastel or permanent markers.
7. They should cut out the horse carefully and place on the foam dots to make it stand out from the background.


Wednesday, June 6, 2012

"Blumpy" Shapes


Here is a womderful video of painter Elizabeth Murray from art 21  While this is a stellar website, many artist profiles have content not suitable for children, but this is one that my students really enjoy. She describes the shapes she paints as "cartoony" and" blumpy." Her art is the inspiration for this abstract art project.
1. After you've finished viewing the video, discuss her art and what the students noticed about it.
2. Do a guided practice drawing where students draw shapes that are poking or squeezing against each other. They can be hard edged against rounded and have holes in them. Emphasize drawing shapes of different sizes and going different directions. They can draw shadows inside the holes to give depth. and shadows at the edges of shapes.


Use colored permanent markers to color in. 

Figures In Motion


This can easily be tied to science, with the concepts of force and motion, and anatomy. The cultural exemplar is Keith Haring and his book Dance.Students can practice drawing proportion and motion in the basic way that Haring did. First students make a "skeleton" in motion using macaroni and pasta, then render a color figure.
Materials:

Michael Jackson clip: YouTube

Pasta lima beans and macaroni, including elbow, straight, shells, penne, fusilli.

Colored paper 9X12

Black paper 9X12

Black marker

Skelton diagrams

Another exemplar I used was Michael Jackson, and his distinctive dance skills. You could also show other examples of dancers, gymnasts and atheletic abilities to emphasize how our bodies can work. If you really want to take some time with it, you can coordinate with the PE teacher some dance moves for the kids to learn.

1. Show the Haring image above and have some of the students come forward and mimic one of the moves in a pose. This enhances their observational skills.

2. Give students a black sheet of paper. You can have them paint the pasta pieces white, or leave it natural. Pass out skeleton papers. Set out bowls of macaroni and have them construct their skeleton in a pose or "stop motion" of some kind. Remind them to start close to the top or bottom, so there is enough room.

Part II

1. Ifyou wish, they can render the same pose as their skeleton, or they can choose a different one for their Haring type figure. Give some guided practice on drawing the figure in the stick figure/bubble method. Again, encourage them to make it big enough.

a, Start with a round head
b.Draw the rest of the body as a stick figure
c. Draw a bubble around the stick  figure. (They always want to draw it too skinny, so allow them to practice a few times.)

2.Once they have it down, they will draw it on their colored piece of paper and cut it out.
3. They will choose a different color of paper for the floor, cut to 4"X9" They will glue this on the bottom of the other paper.
4. They will glue the figure onto the paper, in the placement they wish. (upside down, in the air, etc.)
5. Outline the figure in black marker and draw a line across the top of the floor. Add large polka dots to the floor. Draw some motion lines around the figure.


Tuesday, June 5, 2012

Summertime Projects

Summer is here, and we are taking some breaths and maybe thinking a complete thought here and there! Last year, I thought I might try something a little different for the first project back to school, and we made some summer scenes, because well, it still feels like summer in TX. when we go back to school!

Surfboards
 Materials:
Paper cut to 12X15
Watercolor
Permanent markers
White oil pastel

1.Draw a wave design on white paper about half way up. (Yes, it can be a challenge to see white on white, but the kids actually enjoy the challenge) The paper can be turned either vertically or horizontally. Paint over with blue watercolor.

2. Provide handouts of different surfboard designs, and students can use their own ideas.  color with markers.

3. Use a template, or allow them to draw the surfboard shape, making it big enough. Glue onto waves. Cover surfboard with "wax" (varnish or Modpodge)


Beach Collages

Materials:
White paper cut to 12X15
Manila paper, torn in half lengthwise
Blue plastic wrap, or cellophane
Shells
Sand
Little pieces of towel, cut about 2X3 inches
Tackyglue

1. Paint sky with watercolor.
2. Glue manila paper across the bottom, trim off excess length.
3. Cut a small piece of plastic wrap to fit width wise. Wrinkle it and glue it across the top of manila paper.
4. Make small wavy lines with glue on "sand" or manila paper. Sprinkle sand over it.
5. Glue on some shells and the towel.
6. Glue on a sun.


Flip Flops

The idea for the flip flops came from Art Projects For Kids

Materials:
Colored paper
Strips of printed scrap paper
White square paper about 12X12
Sand
Shells
Brass Brads

1. Paint the white paper with lt. brown watercolor using wet into wet.
2. Use a template to cut out flip flops, and a slightly bigger one for the edging. Glue these together.
3. Glue the straps to the back of the flipflop, coming out horizontally. Let dry.
4. Attach a brad to the ends of the strap and poke through the flip flop and attach. (You can pre-poke a hole to make it easier and more accurate.
5. Decorate background with swirls of glue, then sprinkle sand. Add a few shells


Rain Forest


This rain forest mural can be done with all grade levels, with each one making a certain group, ex. Kinder can make trees and tree branches, 1st gr. can make leaves and flowers, 2nd gr. can make butterflies and insects, 3rd can make reptiles and amphibians, 4th,5th can make any other rain forest animal.

   You can provide a list of animals that come from the rain forest, and they can choose.( Of course, snakes are very popular, so you may need to steer some students towards another really cool animal) Students can use paint, markers and pastels. We discussed the levels of the rain forest and the animals that live in each level. They can place their animal or plant where it should go.