Saturday, June 23, 2012

Circus Elephants

I saw this project on funart4kids but with a few modifications. Love the marker/watercolor idea!


Materials:

Colored paper
Colored string
Black washable marker
Small beads
White paper
Chalk pastel
Glittered or shiny paper

1. You can guide the students in drawing an elephant, or provide a template.
2 Draw the elepant, about 10 inches long.
3. Carefully cut out the elephant.
4. Outline the elephant with black marker, like Crayola. Don't forget to outline the ear. Add some tiny lines on the trunk for wrinkles.
5. Use a wet brush over the marker outlines to produce a watercolor effect.
6. Pre-cut strips of paper for the floor in various colors, about 3 in.wide
7. Let students choose a floor color and background color of paper. Glue floor piece onto background piece.
8.. Glue strips of paper onto background for stripes.
9.  Glue on elephant, except for front foot.
10. Cut out ball  and scalloped border piece. Provide template for the scalloped piece.
11. If desired, stick on pop dots, then glue on scalloped piece for a pop out effect.
12. If desired place a pop dot under the ball for pop out look. Glue on.
13. Cut a blanket from glittered or glossy paper. Decorate with beads or sequins.
14. Cut string into small pieces, glue on blanket for fringe.
15. Shade the floor at the top slightly with a chalk pastel, blend with fingers.
16. Glue colored dots on scalloped awning


Monday, June 18, 2012

Beautiful Horses


This lesson is based on the book by Van Camp and illustrated by Littlechild. I had the idea to combine some of the book's ideas with ideas of Chagall.

Materials:

Paper, cut to 12X15
Oil pastels
Liquid watercolors
Permanent markers
Foam scrap booking dots.

1. Read book to students. Discuss the idea of fantasy and the way the horses are depicted.
2. This can be done with or without a border. We did a simple one inch border with one inch squares.
3.. Do guided drawing for background. Divide the paper into three sections going in diagonals. Use oil pastels to draw very simple lines and shapes, like moons, suns, flower, bird, etc. Emphasize a kind of dreamy quality, like Chagall.They can turn the paper upside down and sideways when drawing shapes. Also emphasize drawing simple outlines of shapes.
4. In one of the three sections, they can draw lines or patterns to fill it in.
5. Do watercolor washes over the pastel drawing.
6. Instruct on drawing a horse with basic shapes, on a separate piece of paper. The horse should be about 6 inches long. They can draw the mane and tail how they wish, and add color and simple lines and shapes with oil pastel or permanent markers.
7. They should cut out the horse carefully and place on the foam dots to make it stand out from the background.


Shiny Moons

A simple project to do with Kinder's or 1st gr.

Materials:

Paper plates
Heavy duty foil
White paint.
Black or dark blue paper 9X12
Touch of glitter, (if desired)
Small cardboard box
Toothbrushes or spray bottles

1. If you are brave enough, let students draw and cut their own crescent shape from the paper plate, otherwise, pre-cut the crescent shapes.
2. Students will cover the moon shape with foil. Demonstrate keeping it along the curve. They can put some glue on the crescent shape beforehand, to help hold the foil in place. Remind them to cover the entire moon, and not leave open spaces. (This takes some patience)
3. Have students flick white paint onto black paper with the toothbrush, to create stars and milky way or they can use a spray bottle to spray it on. (Paint must be thinned) (Place the paper inside the box on its side)
4. Glue foil moon onto paper. You can add touches of silver glitter.


Ropin' Cowgirls and Boys


The drawing instructions for the cowboy come from "I Can Draw People" by Usborne.

1. Draw a light horizon line.
2. Instruct on drawing the cowboy(girl) figure step by step,(circle head, rectangle torso,curved arms and legs, boots, pants,vest rope, etc) Remind students to save room for the rope.
3. Students can then add details to the picture such as colors, patterns on the clothes, and hair.
4. color with markers  and/or oil pastel.
5. Use watercolor to paint in foreground and sky.
6. Add detail, such as a cactus.


Tuesday, June 12, 2012

Pop Art Pizza


Take Heed! You will end up with a lot of paper shreds on the floor!

Materials :

Brown grocery bags
Green paper
Brown paper
Beige scrap paper (like manila) that has been shredded. (You can cut it into shorter pieces)
Red vinyl or pleather.
Red paint
Other colored paper

1. Cut brown paper into long triangle shapes, appr. 10X18 inches. Students will partly roll the wide end to form the crust. Glue down.
2. Paint the triangle, or slice, with red paint for the sauce.
3. Once dry, let students glue on items they want on their pizza. They can cut out little sausage, tomatoe, pineapple, green onion pieces from paper.
4. Students can cut out circles from vinyl, or teacher can do for smaller children.
5. Make sure everything is glued securely.


Adjective Monsters


A more detailed version of this lesson plan can be found on ArtsEdge

This lesson explores the connections between visual art and language arts, and how both are used to creatively tell stories and express emotions. Students will read the book Go Away Big Green Monster by Ed Emberley. They will be introduced to adjectives as descriptive words then create their own monsters using paper sculpture techniques.

Materials:

Black const. papercut to 12X18
Colored const.paper.
Ideas for paper sculpture (twisting, curling, folding,etc)
White chalk or pastel
Sample list of adjectives

1. Read book to students. Discuss the use of adjectives in the book, and ask volunteers to think of some good adjectives. ( discuss adjectives that describe an emotion or the way something looks.

* It is up to you to decide to use a sample adjective list. I usually do this project with 2nd graders and sometimes we end up with a lot of the same adjectives. Encourage using a very unusual adjective.

2.Instruct that once they have decided on an adjective, to think of how they will make their monster look like that word.

3. All parts of the monster face will be cut from paper, no drawing. Instruct that the head must be big, almost as wide as the black paper, and it can be any shape (not nessesarily round)

4. They will write the words at the top half of the black paper: Go Away Big              Monster  with their chosen adjective written in the blank.

5. Demonstrate how they can make their paper parts "stick out" by bending, curling, cutting and folding the paper different ways.

6. They will create their monster keeping in mind to make it look like their adjective.


Thursday, June 7, 2012

Triple Scoops With Sprinkles

.

Materials:
Black paper cut to 5X15
Tempera paints
Tissue paper
Colored paper for edging
1. For little ones, pre sketch a cone shape so it has the right placement so there is room for three scoopes.
2. Paint cone, and each cone a different color. It is best to do them one at a time.
3. Students can choose one cone, and apply confetti or crinkled pieces of tissue for sprinkles.
4. Glue onto a colored piece of 7X17 paper for a more finished look.

Tube Octopuses


Materials

Paper towel tubes
Tempera paint
Colored notebook ring tabs and dots
Sequins
Googly eyes.

1. Have students write their name on the inside bottom of the tube. Paint the outside.
2. Paint the inside a different color, but leave the name at the bottom inside.
2. Cut the tube into 8 even strips to halfway down.
4. Curl them and twist them.
5. Apply rings with glue. Glue a sequin here and there.
6. Glue googly eyes at the bottom

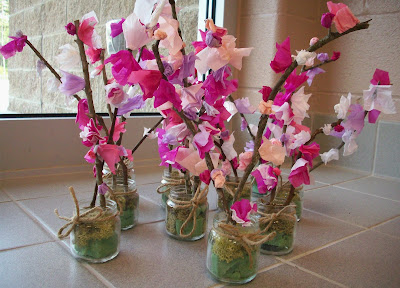
Spring Blossom Sculptures

Saw this idea on Fem Manuals, but with a couple modifications. I have an abundance of baby food jars, so we used those instead of ceramic pots.


Materials:

Twigs, about 10 inches

Pink, and white tissue paper squares
Baby Food Jars
Florist foam pieces
Dried moss
Twine or ribbon
Tacky glue

 1.If you do this with young ones, give students a jar with sticks already poked into some foam inside the jar. This is easier, as students might crush or break the foam.
2. Students will crinkle the tissue and glue it onto the sticks. Remind them that they can make some "buds" also.
3. When done let them place some moss on the top of the jar, and push it around and down so that it fits snugly.
4. Tie the twine or ribbon onto the jar.

These can be used for Mothers Day. If desired students can use paint markers to write something on the jar.

Wednesday, June 6, 2012

"Blumpy" Shapes


Here is a womderful video of painter Elizabeth Murray from art 21  While this is a stellar website, many artist profiles have content not suitable for children, but this is one that my students really enjoy. She describes the shapes she paints as "cartoony" and" blumpy." Her art is the inspiration for this abstract art project.
1. After you've finished viewing the video, discuss her art and what the students noticed about it.
2. Do a guided practice drawing where students draw shapes that are poking or squeezing against each other. They can be hard edged against rounded and have holes in them. Emphasize drawing shapes of different sizes and going different directions. They can draw shadows inside the holes to give depth. and shadows at the edges of shapes.


Use colored permanent markers to color in. 

Figures In Motion


This can easily be tied to science, with the concepts of force and motion, and anatomy. The cultural exemplar is Keith Haring and his book Dance.Students can practice drawing proportion and motion in the basic way that Haring did. First students make a "skeleton" in motion using macaroni and pasta, then render a color figure.
Materials:

Michael Jackson clip: YouTube

Pasta lima beans and macaroni, including elbow, straight, shells, penne, fusilli.

Colored paper 9X12

Black paper 9X12

Black marker

Skelton diagrams

Another exemplar I used was Michael Jackson, and his distinctive dance skills. You could also show other examples of dancers, gymnasts and atheletic abilities to emphasize how our bodies can work. If you really want to take some time with it, you can coordinate with the PE teacher some dance moves for the kids to learn.

1. Show the Haring image above and have some of the students come forward and mimic one of the moves in a pose. This enhances their observational skills.

2. Give students a black sheet of paper. You can have them paint the pasta pieces white, or leave it natural. Pass out skeleton papers. Set out bowls of macaroni and have them construct their skeleton in a pose or "stop motion" of some kind. Remind them to start close to the top or bottom, so there is enough room.

Part II

1. Ifyou wish, they can render the same pose as their skeleton, or they can choose a different one for their Haring type figure. Give some guided practice on drawing the figure in the stick figure/bubble method. Again, encourage them to make it big enough.

a, Start with a round head
b.Draw the rest of the body as a stick figure
c. Draw a bubble around the stick  figure. (They always want to draw it too skinny, so allow them to practice a few times.)

2.Once they have it down, they will draw it on their colored piece of paper and cut it out.
3. They will choose a different color of paper for the floor, cut to 4"X9" They will glue this on the bottom of the other paper.
4. They will glue the figure onto the paper, in the placement they wish. (upside down, in the air, etc.)
5. Outline the figure in black marker and draw a line across the top of the floor. Add large polka dots to the floor. Draw some motion lines around the figure.